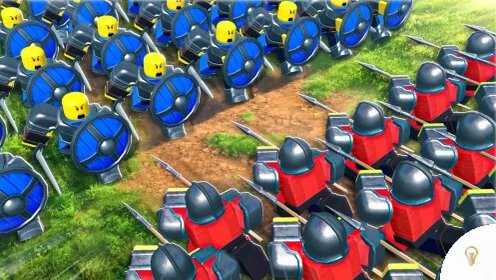
Command an Army is easier to understand when you focus on the battle roles instead of trying to memorize every unit at once. Your army needs a front line, support damage, and a way to respond when the opponent changes formation. This broad beginner guide explains the main decisions to make during your first matches. More specific guides can then cover individual unit families, counters, and advanced formations.
Before spending time on summons, check the latest Command an Army codes. Active codes can provide free Gems and help new players build their first roster without using every reward from match grinding.
Learn the Four Main Army Roles
The current Command an Army guide identifies four broad unit classes: shields, spears, cavalry, and archers. Each class contributes differently to a team battle.
- Shield units absorb pressure and help hold the capture point.
- Spear units provide a defensive answer to cavalry and help protect the formation.
- Cavalry units use mobility to flank, chase retreating enemies, and attack exposed support units.
- Archer units create ranged pressure while the front line keeps enemies occupied.
This role system gives you a useful way to read any matchup. Instead of asking which unit is always the strongest, ask what your army is missing and what the opponent is trying to do.
Why Shield Units Matter
Shield units are important because battles are decided around movement and control of the capture point. A shield unit can stand in front of more fragile troops and give archers time to deal damage. A new player can usually learn the game faster with a stable front line than with an army made entirely of damage dealers.
Shield units still have weaknesses. They can be surrounded, ignored, or pressured by units designed to break defensive positions. A shield wall also becomes less effective when support units are too far away or when cavalry reaches the back line. This is why shield units should be viewed as the foundation of a formation, not a complete strategy by themselves.
What Counters Shield Units?
The best counter depends on the situation. A shield unit is easier to defeat when it is isolated, attacked from multiple directions, or denied support. Spears and shield breakers are especially important parts of the counter discussion.
- Shield breakers can pressure defensive units and create openings in a front line.
- Flanking cavalry can move around the shield wall and attack archers or exposed players.
- Ranged pressure can punish a shield unit when it has no support or cannot reach the objective.
- Formation changes can force a shield army to turn and lose control of its strongest position.
Do not send one unit into a shield formation without support. A counter works better when the main force creates pressure while another group attacks the weak side. This topic deserves its own advanced guide because the best response changes with the map, the objective, and the units behind the shield wall.
Use a Simple Beginner Formation
For early matches, place shields at the front, supporting melee units behind them, and archers at the back. Keep the army close enough that the front line can protect the damage dealers. If you spread every unit across the map, opponents can defeat each group before the others arrive.
Formations are commands that affect how troops approach the battle. A line can help you move through open space, while a tighter formation can protect the center. A circle can be useful when cavalry is trying to charge through your army. Experiment with these options during normal matches instead of waiting for a perfect lineup.
Attack and Defense Basics
Defending is often easier for a new player because the objective gives your army a position to protect. Put durable units near the point, keep archers behind them, and watch for cavalry moving around the edge of the map.
Attacking requires more patience. Move as a group, avoid sending units into the objective alone, and look for a moment when the defender’s support units are separated. A failed push is not always a lost battle. Pull back, regroup, and attack from a better angle when possible.
Spend Gems with a Plan
Gems are used for summons, so new players should not spend them immediately without checking the active banner. Banner odds can change, and some units are more useful when they complete an evolution path or fill a missing role.
- Check the current banner and its displayed odds.
- Keep enough units to field a complete formation.
- Save duplicates that may be useful for Ascension.
- Sell extra duplicates only after checking their upgrade value.
- Use Luck Potions on a banner that fits your plan.
Redeeming active codes is a simple way to add resources before making these decisions. Codes can expire, so check the code tracker regularly rather than assuming an old reward still works.
Choose Starter Units for a Complete Team
Archer is useful for players who want to work toward a ranged evolution path. Shieldman gives a new account a dependable front line. Scout Rider adds mobility when you need to pressure the sides of the battlefield. These choices do not need to be treated as a permanent tier list. Their value depends on your formation and the opponent’s plan.
Rare units can be exciting, but a balanced army is often more useful than one expensive unit surrounded by empty space. Build a reliable base first, then add specialized units as your Star Limit and account level increase.
Save the Specific Questions for Focused Guides
A broad beginner article should help you understand the system without trying to answer every matchup. Once you understand the four roles, you can study more specific topics such as shieldbreaker units, the best shield formations, cavalry counters, archer positioning, summon odds, and evolution routes.
This structure also makes it easier to improve your strategy over time. Start with the basic roles, identify the problem in your current army, and then choose a focused guide for that exact problem. The goal is not to use one formation in every match. The goal is to understand why a formation works and when to change it.
Beginner Checklist
- Redeem current codes before your first major summon session.
- Keep a shield unit in front of fragile support units.
- Use spears or other answers when cavalry threatens your formation.
- Protect archers instead of leaving them alone near the objective.
- Use cavalry to flank rather than charging directly into a shield wall.
- Check banner odds before spending Gems.
- Save useful duplicates for Ascension.
- Study a focused counter guide when a specific unit keeps defeating you.
Once you understand the basic shield formation, you can learn how to break defensive lines in our Command an Army shield units and shieldbreakers guide.
<
Final Advice
Command an Army rewards players who understand roles, spacing, and timing. Begin with a balanced formation, use codes to support your early progress, and observe how the opponent builds their army. When you notice a repeated problem, turn that problem into your next focused study topic. Shield units and shieldbreakers are a good example because they connect defense, counters, formations, and positioning in one part of the game.
FAQs
The main roles are shields, spears, cavalry, and archers. Shields hold ground, spears help against cavalry, cavalry provides mobility, and archers create ranged pressure.
Place shield units in front, supporting melee units behind them, and archers at the back. Keep the army close enough that the front line can protect the support units.
Use shield breakers, flanking cavalry, ranged pressure, and formation changes. The best answer depends on the opponent’s support units and the map.
Check the active summon banner and its displayed odds first. Save enough resources to build a complete formation and keep useful duplicates for Ascension.
You can find the latest active rewards on the Command an Army codes page at Gets Hint.